
This post is sponsored by IKEA Stoughton, but all words/ideas/opinions are entirely my own.
It’s been 92 days since my last copper DIY.
Yes, I keep track of these things.
Never fear, I’m getting us our copper fix today with this DIY copper mirror that is also an IKEA hack, it’s like the perfect combination of crafting goodness.
I’m so stoked to share this project with you, not only because I love how it turned out, but because it means…my entryway makeover with IKEA Stoughton is nearly complete. I’m just finishing up one more project, adding some details, oh yeah and assembling the furniture, then shooting and editing…well anyways it will be ready next week, yay!
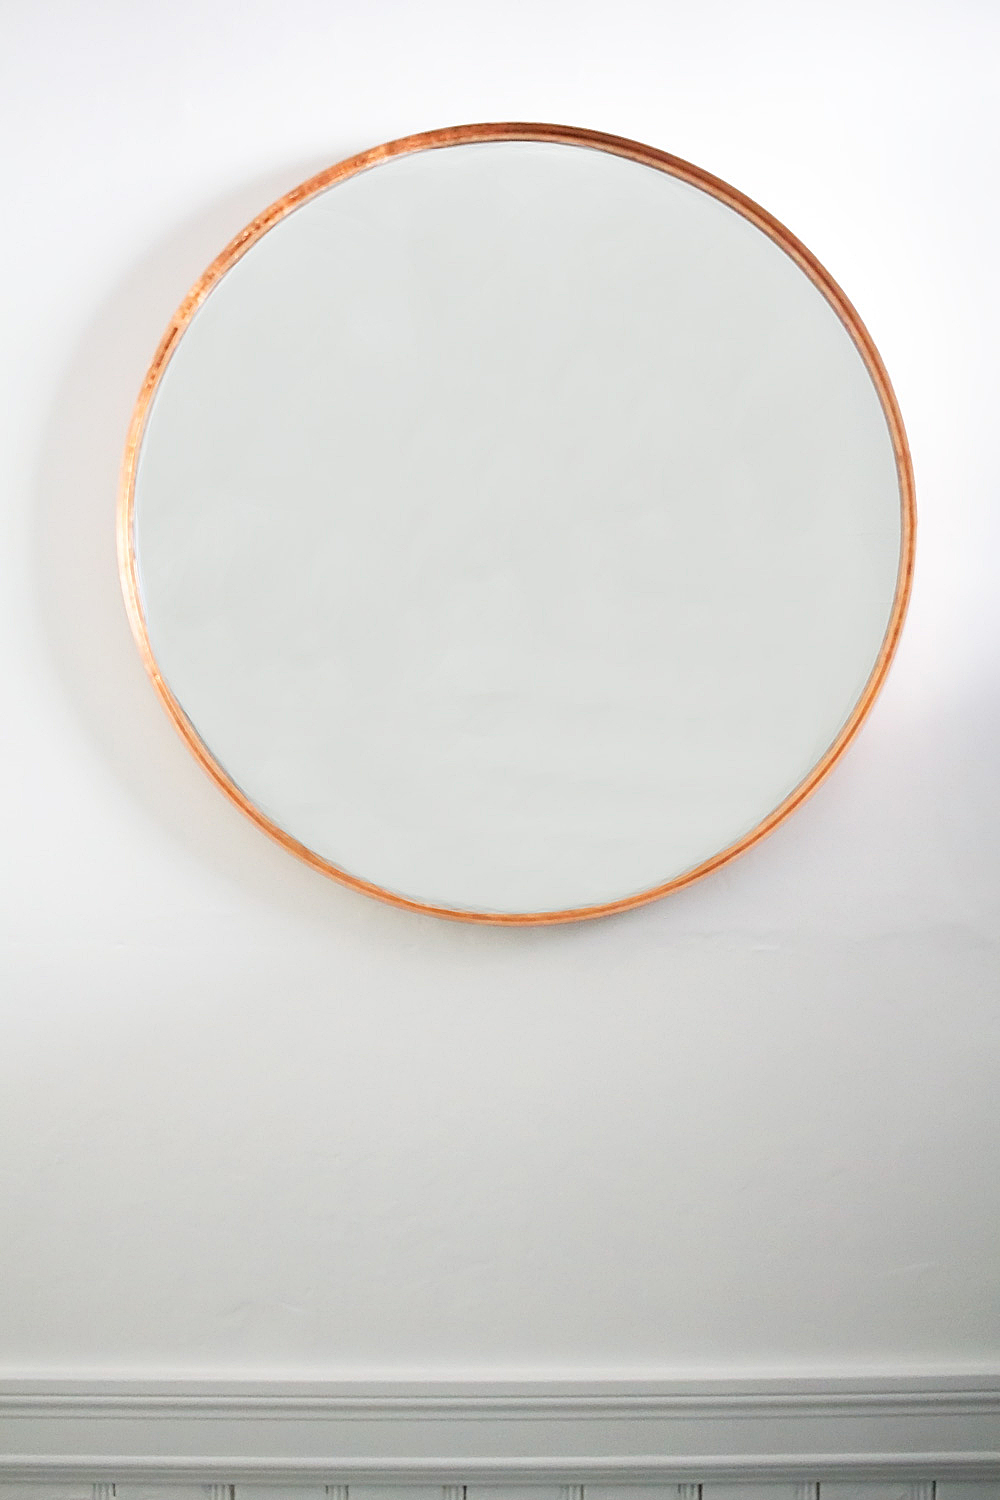
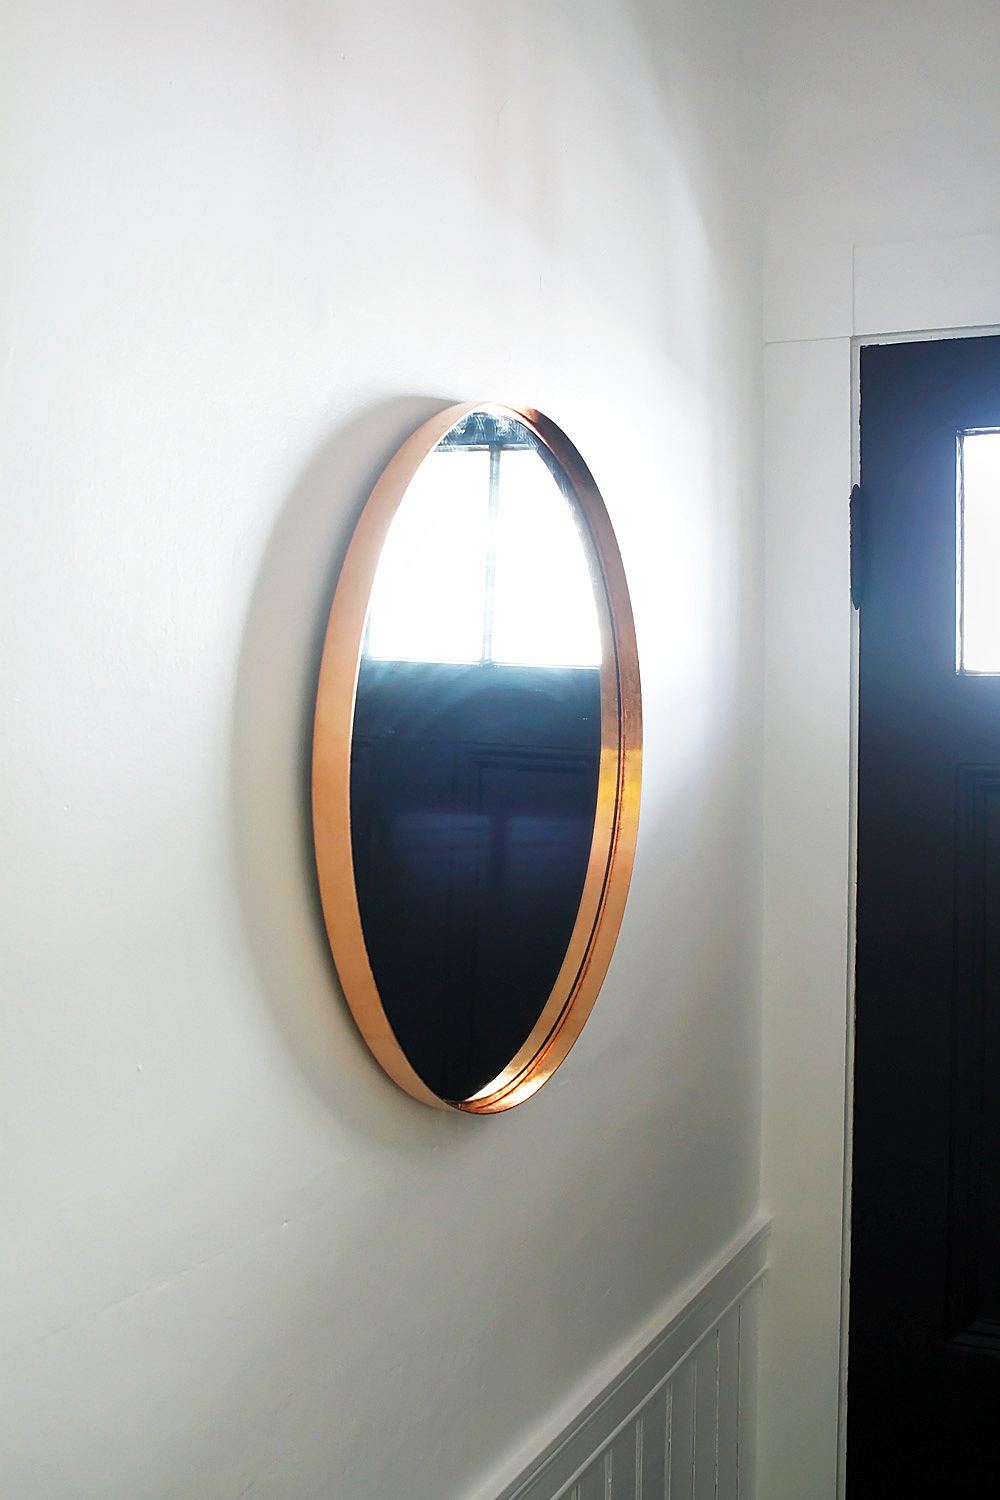
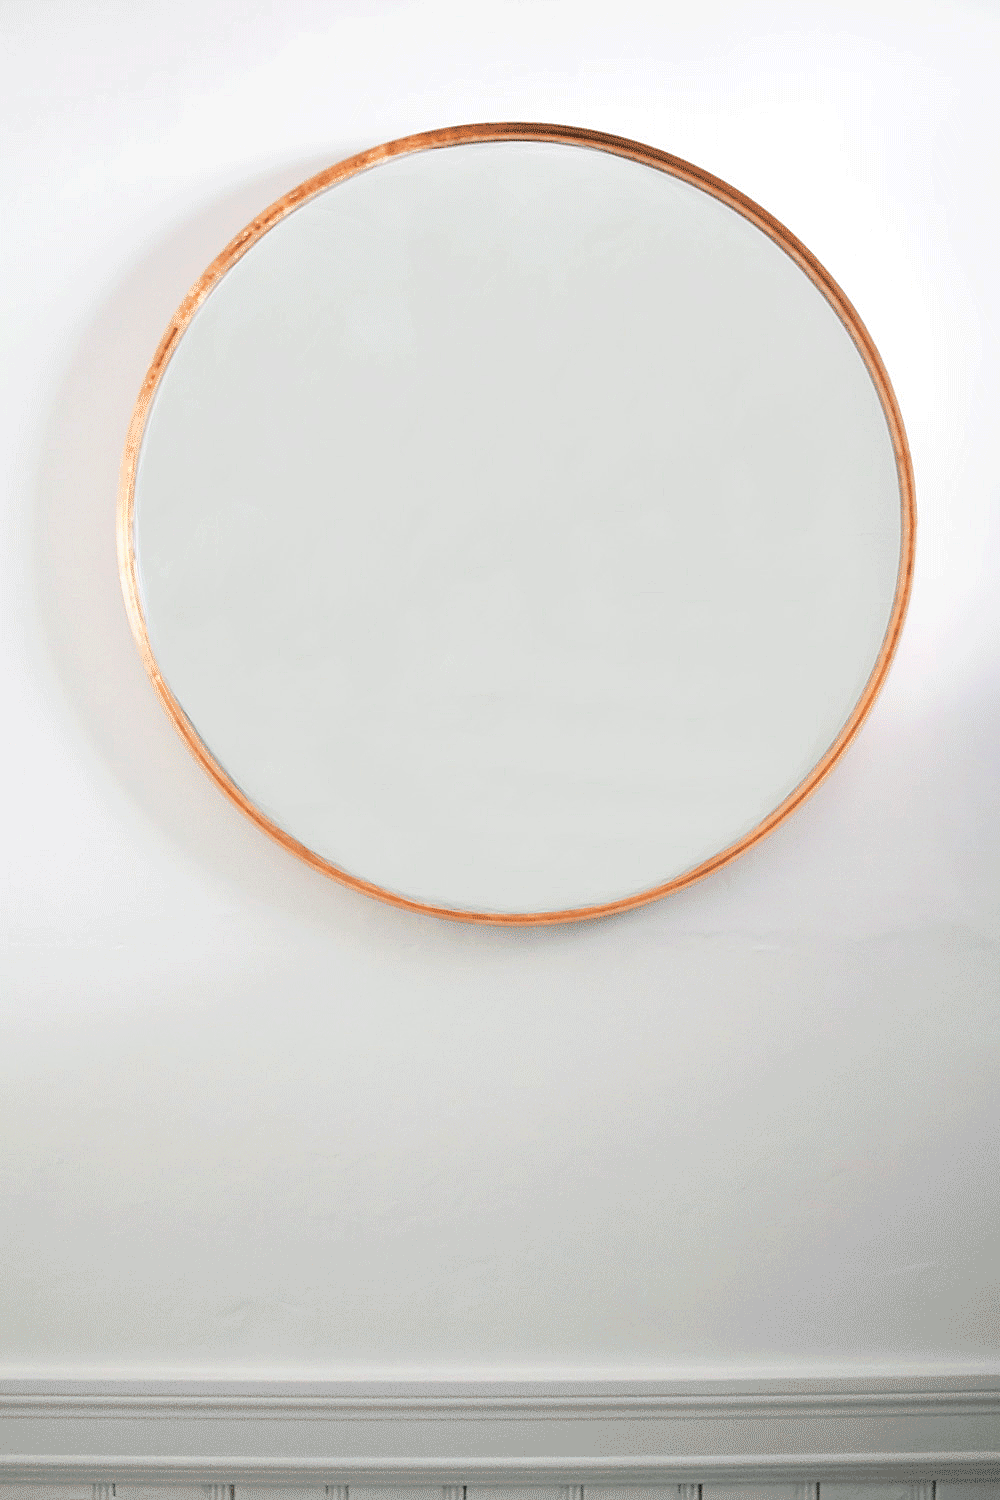
Back to the mirror, can you believe this beauty started out as an ordinary GRUNDTAL? I don’t necessarily have anything against the original stainless steel finish, but as you know copper has my heart forever and always. And that warm, bright, reflective finish adds the punch of warmth necessary to a big white wall.
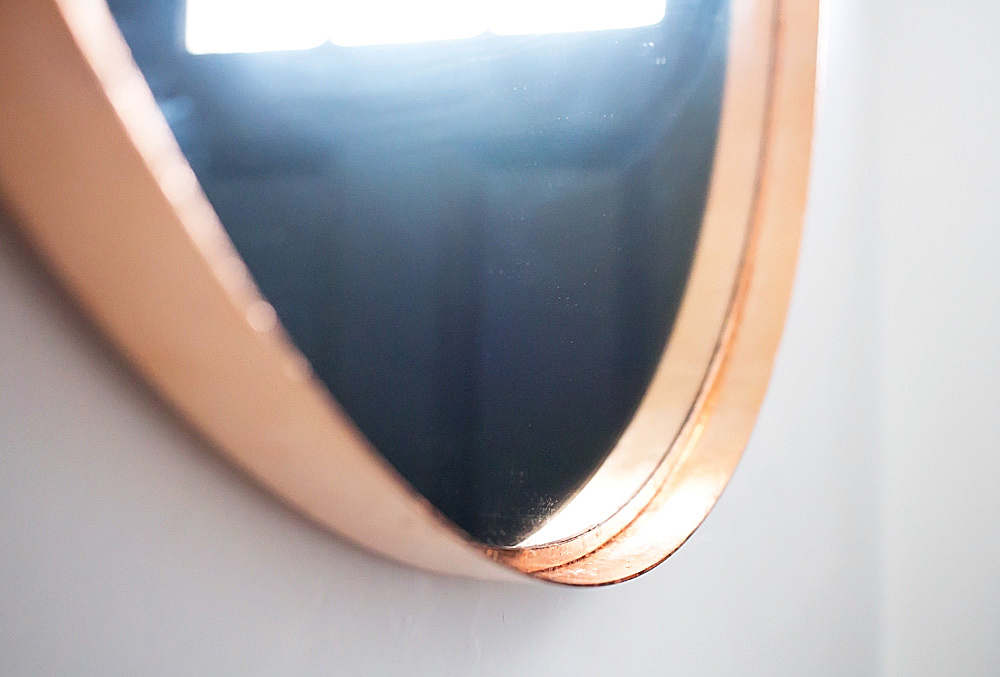
Oh yeah and you can use metal leaf on metal, who knew?
Psst: that door used to be army green! And that beadboard wasn’t even there!
So this was my first time using metal leaf. In case you haven’t noticed, I like to use this blog as an excuse to try out new crafts. That’s right, I am your crafting guinea pig.
It. Was. Easy. (Especially after I pestered my friend Amy with questions. Her striped gold foil bowl is an inspiration!)
Because the leaf is very delicate to work with, this is a time-consumer though. Plan to make this one when you’ve got a few hours at a time, or during your next Netflix binge.
IKEA Hack DIY Copper Mirror
Skill-level: Easy!
Time: A few hours.
What you need:
+ GRUNDTAL mirror ***
+ copper leaf (I used about 3/4 of the pack for this project)
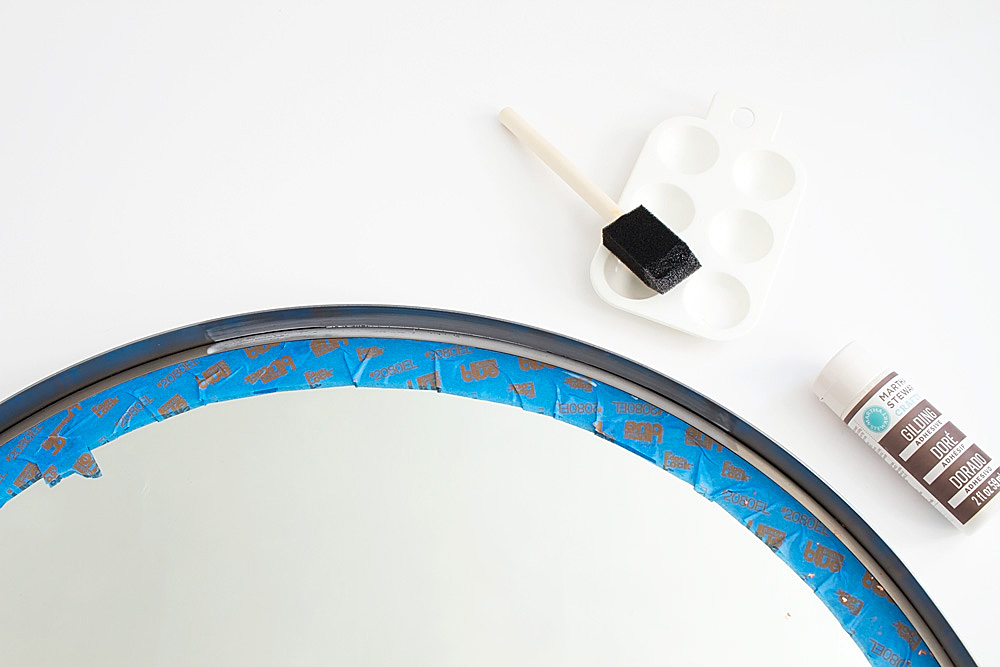
+ metal leaf/gilding adhesive (I recommend the Martha Stewart brand as all the others have “harmful vapor” warnings, eww)
+ 2 small foam brushes
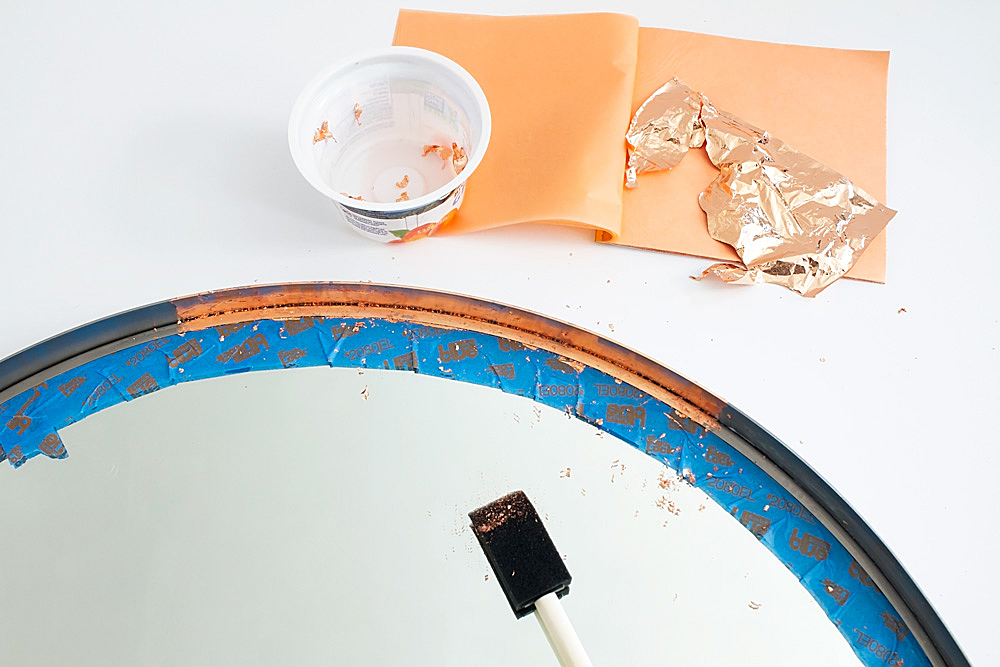
+ paint palette (you can totally use an empty yogurt cup)
+ newspaper or paper bags to protect your work area
+ painter’s tape (washi tape also works well)
***Apparently this mirror is no longer available! But metal leaf will work on any hard surface, so you can use any mirror you choose. Try this similar one from IKEA. This one would also be cool.
What you do:
Step 1 – Mask off the mirror all around the edge so that you don’t get adhesive on it.
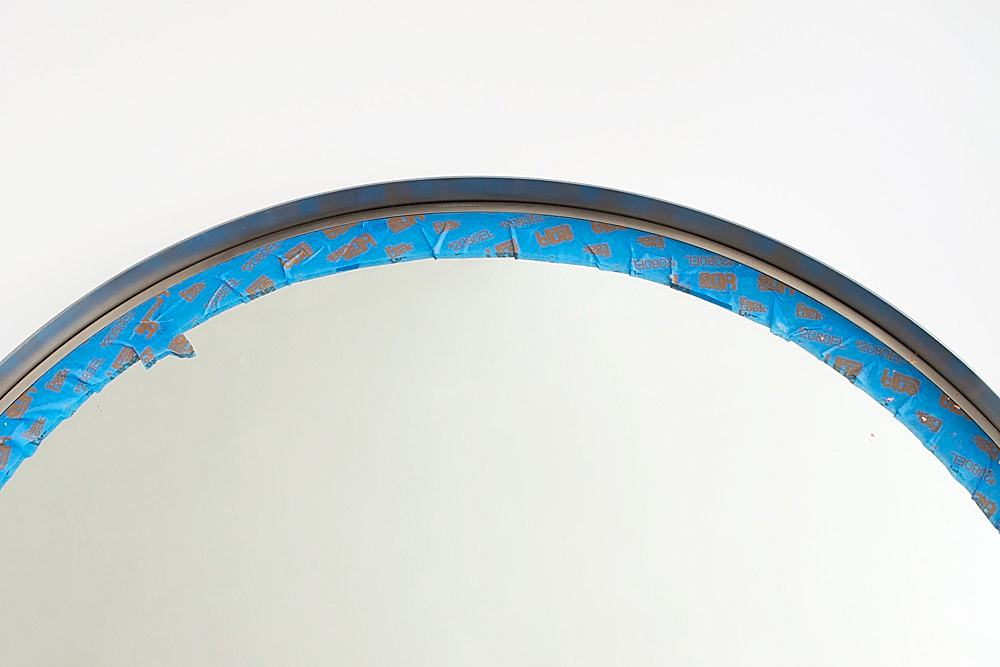
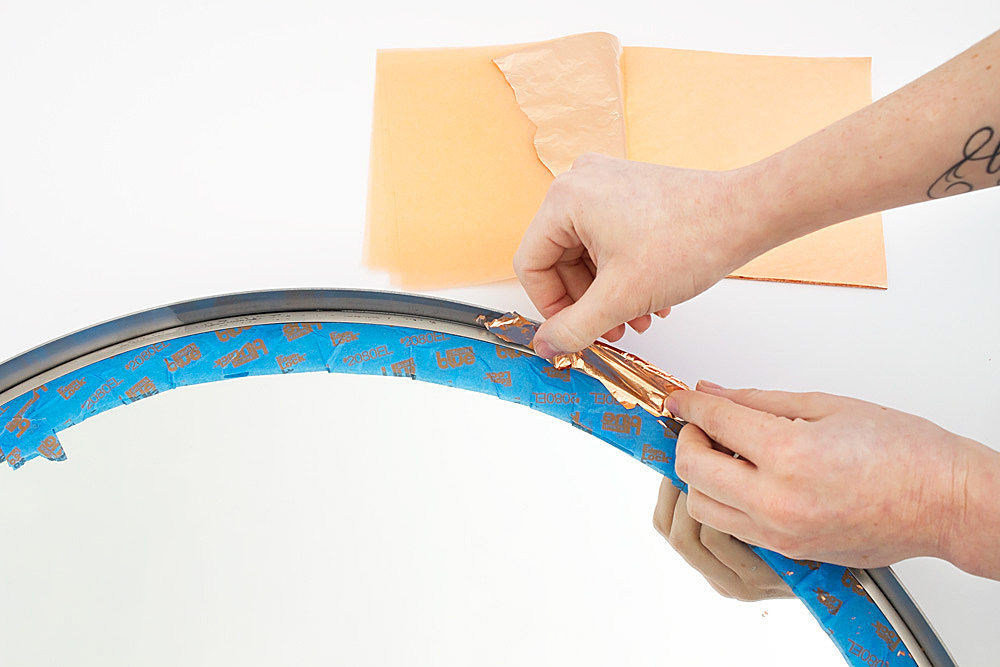
Step 2 – Using a foam brush, apply a thin layer of adhesive to the first part of the frame that you want to copperize (technical term). Work in a smallish section so the adhesive doesn’t dry out too much before you get to it.
Allow the adhesive to dry for a few minutes until it looks mostly clear and is slightly tacky to the touch. How long this takes depends on how thickly you applied it, but 5-10 minutes should do it.
Step 3 – Once the adhesive becomes tacky, lightly — lightly — grab about 1/3 of a sheet of copper leaf and lay it on top of the tacky part. Gently press the sheet down using the pads of your fingers. Don’t worry about covering all of the adhesive in one go, you definitely won’t.
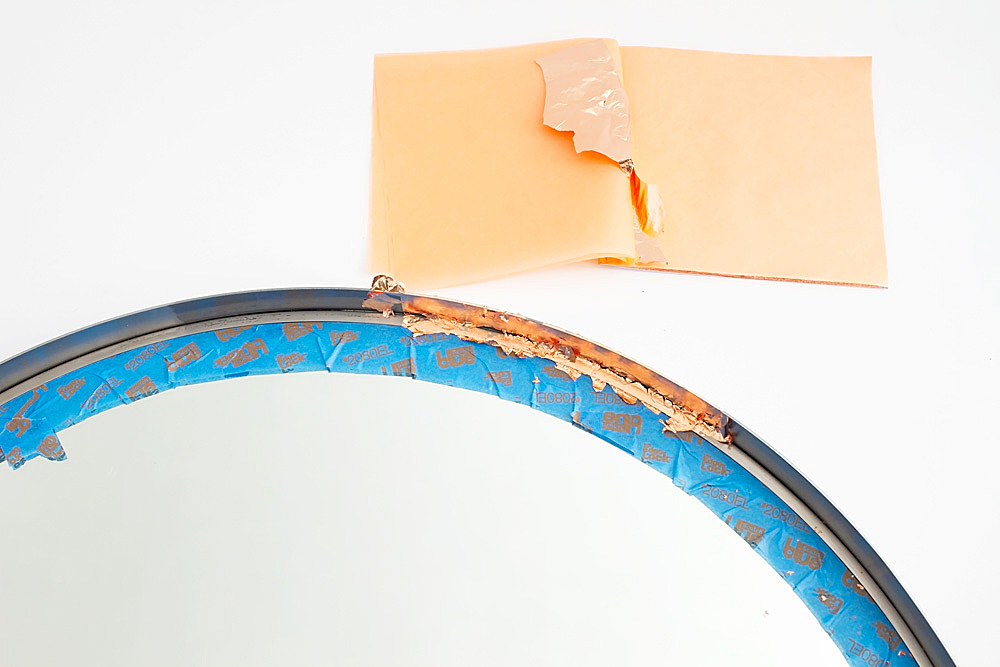
Step 4 – When you’ve covered all of the tacky adhesive, use a DIFFERENT foam brush to gently brush away the excess leaf. Any pieces of leaf that weren’t totally touching the adhesive will come away in little flakes.
It’s helpful to have somewhere to gather the flakes, again I’m super pro and using my husband’s empty yogurt cups.
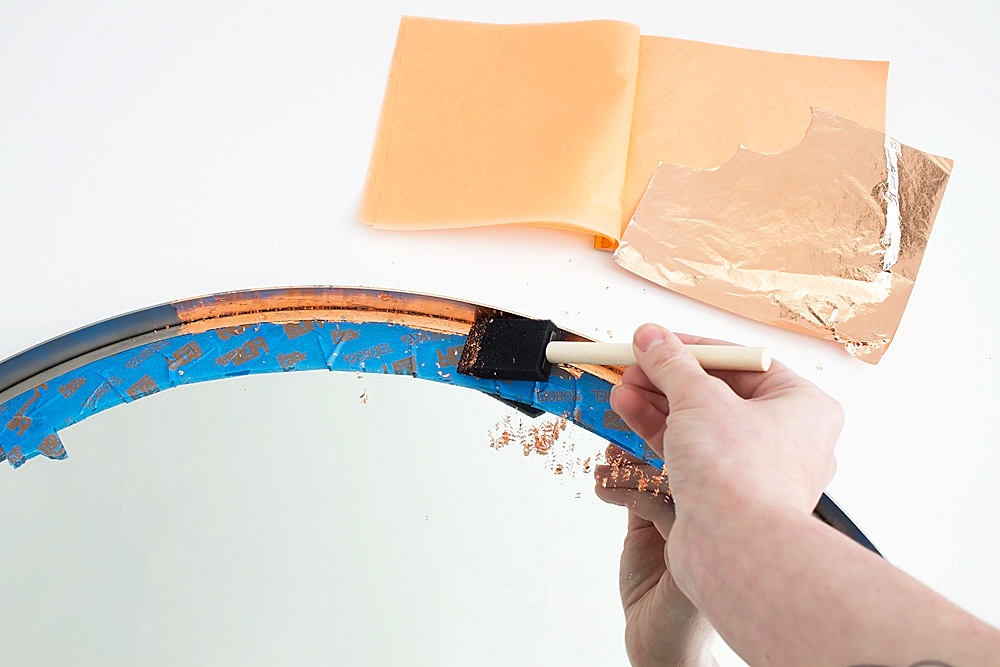
Step 5 – You will find little spots where the leaf didn’t stick. That’s ok though, just apply more adhesive and more layers of leaf. Remember to keep the adhesive brush and the cleaning brush separate! Oh and those flakes you’re gathering? Use them to touch up the empty spots.
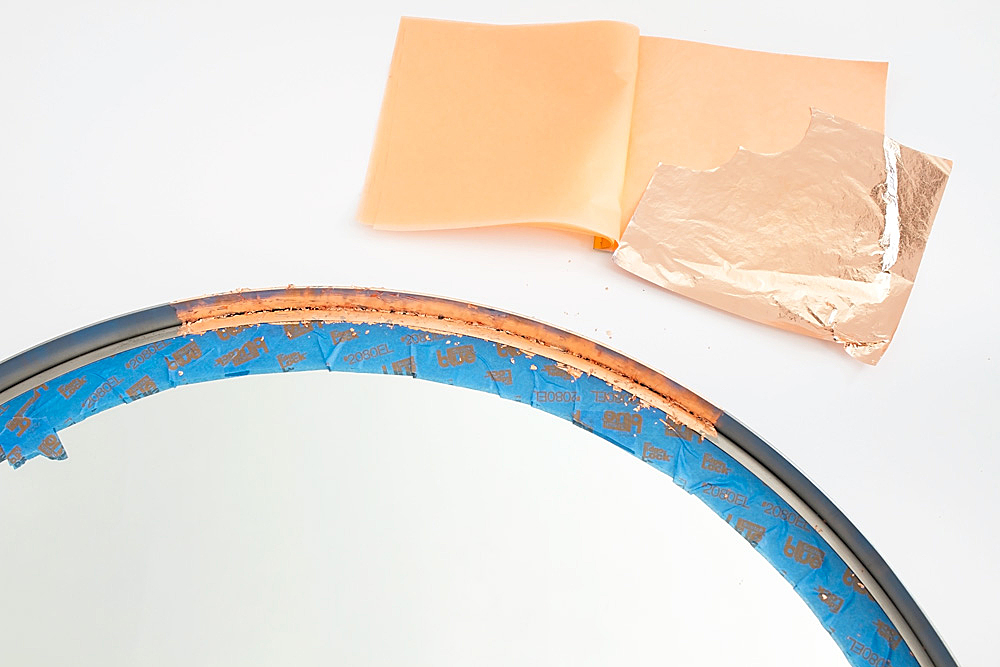
Step 6 – Repeat, repeat, repeat until you’ve covered the whole mirror frame, inside, top edge, and outside.
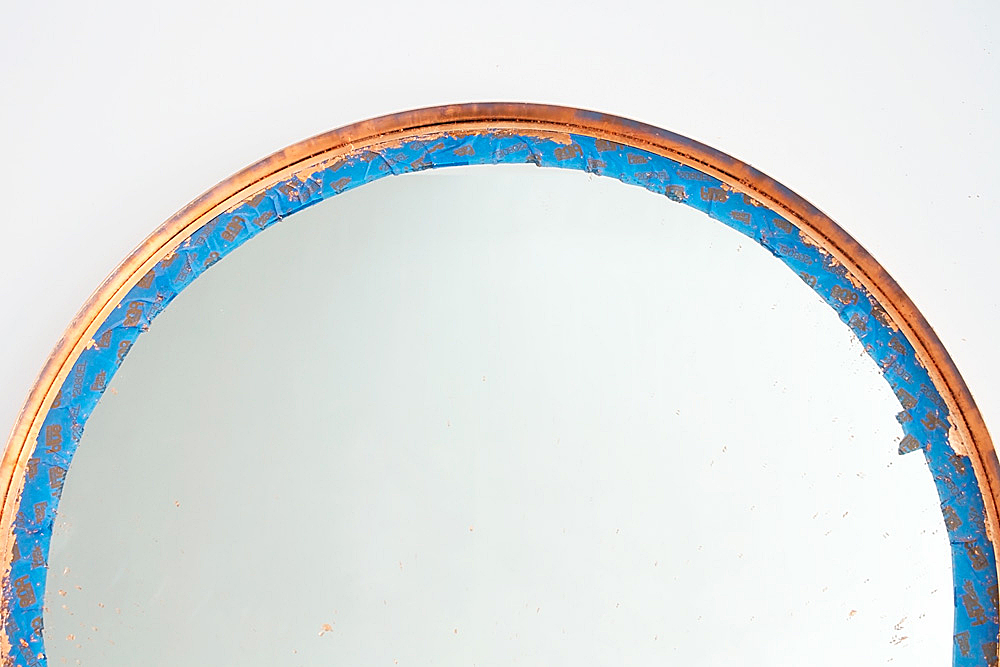
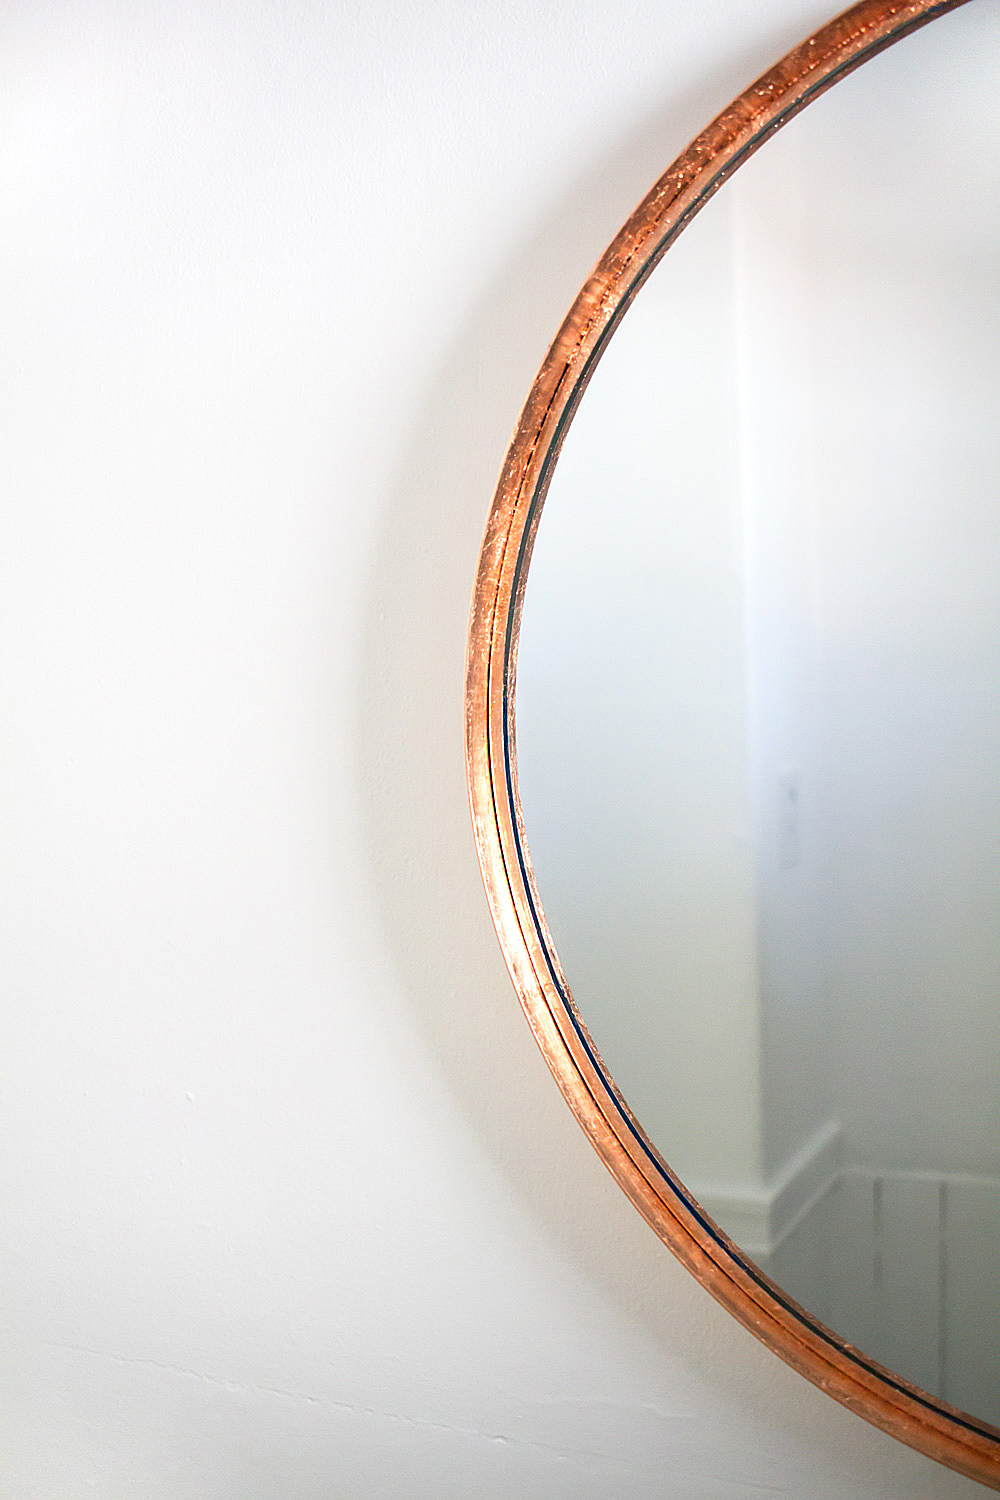
Step 7 – After it’s all leafed, you’re ready for my favorite part — pulling off the tape and seeing that crisp edge.
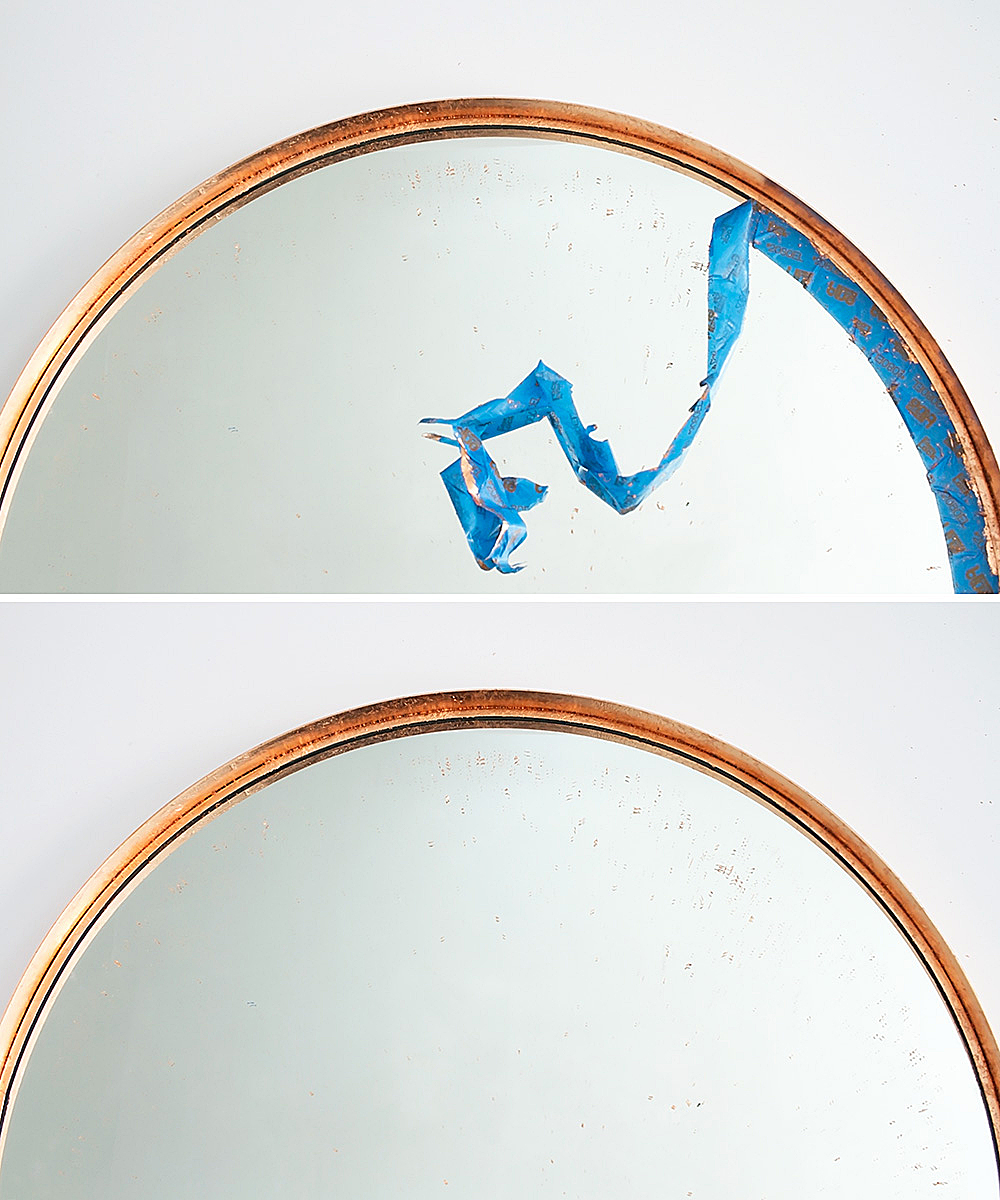
Clean all the copper dust off that beauty and hang it up.

I’m playing with attaching this faux air plant to it for some greenery in our entryway, what do you think?

By the way I’m not a vampire, I just spent way too much time figuring out how to do this in Photoshop:
I can’t waaaaait to show you the rest of the space! And also, to use it. I painted the floor (what) and it’s still off-limits to heavy traffic, so we are waiting a few more days to install everything. It is killing me, I just want to use it already.
So what do you think, will you be trying out copper leaf for your own IKEA hack? I bet it would look amazing on the GRUNDTAL knife rack too.


That came out great! ROFL re: vampire comment! Funny story, one time Martha Stewart came into my old job, and I took a couple photos of her with the shop owners, but in one photo her eyes were closed, and in the other one everyone else was blurry. So I took the eyes-closed one and cut and pasted Martha’s eyes from the other photo on it in Photoshop so I could post it on our Facebook page. But the real fun was switching back and forth between the two layers in Photoshop… “Martha, blink twice if you think I’m the next crafting superstar.”
LOL, I LOVE switching between layers in Photoshop. And I can’t believe you met Martha Stewart and never told me!!!!
https://www.facebook.com/JoEllenDesigns/photos/a.145116508861649.20155.139685436071423/616055771767718/
This came out amaaaazingly, and I totally love your disappearing GIF! 😉 Now I want to copper leaf ALL THE THINGS!
Thank you! At this point my decorating plan is to just cover everything with copper. I will live in a copper dreamworld.
This is ridiculous. So so gorgeous. Pinning. Marlene, this entry is going to be epic, I CAN TELL! And how sweet of you to give me a foil shout out. xo
You are making me blush, Amy! THANK YOU! xoxo
Always love a good (and simple) IKEA hack and this one is gorgeous!
Aww thank you Sarah! <3
So goregoussssssssssss
Thank youuuuuuu!
I made me want to copper leaf all the things, lol! Thank you, Stephanie!
Gorgeous! One of my fave hacks to date! xo
That’s a high compliment, thank you!!!! 😀 xoxo
Holy cow Marlene this is just GORGEOUS!!!! I need to get myself some of those leaf sheets. I just have the crumbly gold leaf and it’s such a pain to work with. Looks like those sheets give a really nice finish. I think I need to get myself a grundtal mirror!
The crumbly stuff does look annoying but I found the sheets so easy! I hope you try it! Thank youuuuuu! xoxo
Love this hack – the mirror looks so chic and elegant. Now all I can think of is that I NEED some copper leaf in my life!
You really really do, it is the best thing ever! Thank you!
I love how this turned out! Did you need to coat the finished product with anything?
Hi Ali! Thank you so much! Since the mirror is not really going to be touched or heavily “used”, I didn’t seal the copper leaf. If you use it on an object that will get more wear, I recommend sealing the leaf with a metal leaf sealer (you can find different brands in the craft store). I’ve also read that Mod Podge works, though I haven’t personally tried it. Let me know if you have any other questions, and thank you for reading! xoxo
I totally dig this! Leafing is so fun and totally effective. Great post!!!
Thank you!! This project turned me into a leafing fanatic. 😀
HI there! Super cool project! IKEA no longer has those mirrors in stock – what else can you recommend we use? Does the material have to be stainless steel for the copper to work? Would it stick on a wood frame?
Thanks!
Hi Alison, I’m SO sorry for taking so long to get back to you, I was traveling abroad for three weeks! That’s a bummer IKEA isn’t carrying these mirrors anymore. The good news is yes, you can use metal leaf on wood! It can be applied to any hard surface, so you can use it with any mirror frame. I hope that helps! xoxo
Wonderful transformation and I love it! Thanks for sharing this amazing post.
I’m so very glad you like it! Thank you! <3