Inspiration

Make it Friday: Inspiration Mania

05.09.14

My jet lag wore off. Yay sleeping at normal times!

Unfortunately (or fortunately?) it’s been replaced by a completely manic need to make and decorate and organize and be productive. So manic that I accosted my upstairs neighbor while she was on her way to the basement and rattled off a series of plans to improve the apartment. She is now intimately familiar with the layout of my bedroom, despite having only seen it once.

I can get a little carried away when it comes to DIY dreams.

Which leads me to today’s project roundup. Inspiration mania! I can’t get enough of all the fantastic DIYs that have been making the rounds the last few weeks. Clearly I’m not the only one with spring fever.

Make it Friday: Inspired DIYs via Jade and Fern

Wouldn’t South by North’s constellation wall decor look amazing on a headboard?

Because I am a super trendy blogger, I obviously love anything agate. These agate magnets by A Bubbly Life are a brilliant way to bring agate into the kitchen.

The Thinking Closet knows the way to my heart with this simple shoe makeover: triangles!

Oleander and Palm nailed it with her fabulous yarn art. That angle design! The colors! Adding it to my already impossibly long list of projects.

Hairpins don’t stay put in my thin, arrow-straight hair, but House of Earnest’s lacquered message hairpins—made with ALPHABET PASTA!!!—could definitely be recreated as a brooch or other jewelry.

Enough inspiration, time to go make stuff! Before my plans get really out of hand…

What about you, any project ideas, big or small? What form does your spring fever take?

30 Minutes or Less / DIY

Back with a Tiny Bang – DIY Fresh Flower Letter Sorter

05.07.14

Oh hey there! I’m back from Germany!

My month of family and pretzels in the old motherland was fantastic, but I’m SO excited to be back. I missed blogging and making and peanut butter and the cats and Alan. Plus suitcase-wrinkled clothes get really old after four weeks.

Before sharing more about the trip—prepare to be subjected to a lot of pictures—I wanted to dive back in with a mini project. Which is less of a project and more of a 5-minute-decorating-idea. I have been ITCHING to get my hands crafting again, but I’m knee-deep in partially unpacked stuff and still on German time. So mini faux-project it is.

DIY Fresh Flower Letter Sorter || Jade and Fern

Spring in New England lasts about 10 minutes, so we really only get two good weeks of flowers before the heat and humidity ignite them (along with me). I’ve arrived in time for the second, which means I’ve been scurrying around the neighborhood with a pair of scissors, snipping little buds off of flowering trees. Only the ones on public sidewalks, I’m not that cheeky.

This DIY fresh flower letter sorter is my attempt to bring some blooms in to our mostly vase-less apartment, and it totally cheers up my “office.” (Incidentally, the corner of our bedroom that serves as our office looks nothing like the dreamy white space above. Ugh.)

DIY Fresh Flower Letter Sorter || Jade and Fern

Holy pink overload, this turned out crazy feminine. You can tone it down with different colors if that isn’t your thing. I’m kind of digging it for now, though, and fresh flowers are temporary after all!

DIY Fresh Flower Letter Sorter || Jade and Fern

It’s pretty obvious what’s going on here, so I’m not gonna break it down for you. Just grab a desk accessory and a handful of flowers and have at it! You can weave the flower stems in, or stick them on with washi tape.

I think this would be a sweet surprise for a work-at-home mom on Mother’s Day, don’t you?

DIY Fresh Flower Letter Sorter || Jade and Fern

DIY Fresh Flower Letter Sorter || Jade and Fern

Also, I now desperately want to cover the entire apartment in washi-taped flowers. Like really badly. Look at this photoshoot prop fabulousness:

DIY Fresh Flower Letter Sorter || Jade and Fern

That’s all from me until jet lag subsides. But I’ve got a number of projects in the works! And—this is the year that apartment painting will happen. There, I’ve said it online, now it’s true.

Now I’d love to hear from you, dear blog friends! How were your respective Aprils? Any spring/summer DIY plans? Have you been grabbing up flowers too?

Food

Guest Post: Mini Vegan Key Lime Pies for Cinco de Mayo

04.23.14

Hello from Germany! This is yet another voice from your past. Except you’re reading it in your present, so it’s kind of like that “When will then be now?!” scene from “Spaceballs.” 

Anyways. Today my friend Becca of Ladyface Blog is kindly filling in for me with a VERY yummy treat that would be just perfect for Cinco de Mayo in a couple weeks: mini vegan key lime pies! I’m always excited to see how omnivores feel about vegan food—it’s the ultimate test. Read on to see how she fared!

Hi everyone! My name is Becca and I normally blog over at Ladyface Blog where I talk about my life, and share my style, recipes, and DIY projects. I absolutely adore Marlene’s blog, so when she asked if I could do a guest post for Jade and Fern I was thrilled to do so!

Since I know Marlene is vegan, I thought it would be fun to share a vegan (and gluten free!) recipe today! Lately I’ve been hearing all about the wonders of cashew-based vegan desserts, and to be honest, have been a bit skeptical. I just keep thinking, how could CASHEWS, of all things, replace the certainly-not-very-good-for-me, high-fat dairy products that are near and dear to my heart? Well, The Minimalist Baker recently posted this recipe for cashew based mini Vegan Key Lime Pies that looked too good for words, so I had to try it out.

Let’s be real: key lime pie is usually all about the heavy whipping cream and sweetened condensed milk, so I was really curious to see how these would come out. Well, my dairy-loving heart is happy to report that these mini key lime pies are really damn tasty. So good, in fact, that out of the batch of 12, only 6 survived the weekend. It’s true.

Let’s get on to making them, shall we?


Vegan Key Lime Pie: Makes 12 mini-pies or 1 large one

Recipe by The Minimalist Baker

Ingredients:

For the crust:

  • 1 1/4 cups graham cracker crumbs (About 1 sleeve of graham crackers. I used gluten free)
  • 1/4 cup (4 tbps) vegan butter, melted (such as Earth Balance)

For the filling:

  • 1 cup raw cashews soaked for 4-6 hours (or overnight), then drained
  • 3/4 cup light or full fat coconut milk, well shaken (I used full fat since it’s what I had on hand)
  • 1/4 cup coconut oil, melted
  • 1 tbsp lime zest and 1/2 cup lime juice from 2-4 large limes or 6-7 key limes (if you can find them)
  • 1/3 – 1/2 cup agave nectar (depending on preferred sweetness)

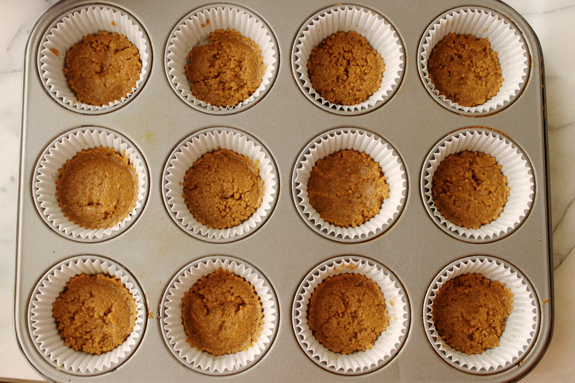
1. Preheat the oven to 375°F and line a standard muffin tin with 12 paper liners.

2. Add graham crackers to a food processor and process until you achieve a fine meal. Then add the melted butter and pulse to combine.

3. Distribute evenly among muffin tins and press down with a glass or spoon to flatten. Bake for 10 minutes or until golden brown. Remove and set aside to cool.

4. Add all filling ingredients to a blender and blend on high (or liquify) until creamy and smooth. (Just to note, I tried this out in a food processor, and I just couldn’t get the cashews to break down as much as I needed them to. My stand blender is garbage, so I switched to my stick/immersion blender and that did the trick.) Taste and adjust flavor as needed, adding more lime zest/juice for more tart, or more agave for added sweetness.

5. Pour filling into the muffin tins and tap on counter to release air bubbles. Top with a bit more lime zest and loosely cover.

6. Freeze for 2-4 hours, or until firm. Remove from the freezer for 10-15 minutes to thaw before serving. They will keep, covered, in the freezer for up to 2 weeks, though are best when fresh.

Just to note, these do, in fact, need to be stored in the freezer. If kept in the refrigerator they will have more of a pudding-like texture, so they’d be a bit tough to eat in their mini-pie form!

These mini Key Lime Pies are seriously tasty: sweet, tart, creamy, and delicious. If you’re looking for a delicious dessert, vegan or not, I would highly recommend this dreamy little guys. I hope you can try them out soon!

Thanks to Marlene for hosting me on Jade and Fern today! I hope to see some of you over at Ladyface Blog soon!

XOXO

Becca | Ladyface Blog

Thank you, Becca, for braving vegan baking for us, and for these beautiful photos! Readers, please be sure to visit Ladyface Blog and show Becca some love!

Don’t these pies just put you in the mood for SUMMER?? Have any of you omnivores tried vegan baking before? And who’s planning a Cinco de Mayo party?


Inspiration

Make it Friday: Easterish DIYs

04.18.14

This is a voice from your past. I’m writing this post the day after St. Patty’s Day from a blustery, frigid March, and I am craving FLOWERS.

I’m assuming April has been lovely and springlike so far—unless I’ve just jinxed it for us all—but here are the flowery and Eastery DIYs that inspired me back when it was still winter.

Make it Friday: Easter DIYs via Jade and FernI just adore this simple Easter egg hydrangea garland by Paper & Stitch.

Cement centerpieces may not scream “Easter,” but wouldn’t they look gorgeous stocked with fresh flowers for a modern Easter table? By Green Wedding Shoes.

Speaking of fresh flowers, this flower chandelier by The Sweetest Occasion needs to exist in every room of my apartment.

Easter trees are traditional in Germany. Make one with pussy willow branches and hollow eggs like this gorgeous version by Semplicemente Pepe Rosa (in Italian).

White Gunpowder created this paper bird’s nest place setting—a sweet update on a classic.

Intended for St. Patty’s Day, I think this paper flower wreath by The House That Lars Built would be just stunning for Easter, don’t you?

And a bonus DIY for good measure: confetti poppers filled with real flower petals. Real. Flower. Petals. !!!

Here’s hoping that spring is gorgeous, wherever you are!

Inspiration

Crushing On: Homey oh my!

04.09.14

Hello from Germany! Today I’m so excited to share another blog crush with you. Because my favorite part about blogging DIYs is finding—and sharing—the fabulous bloggers out there.

I’m sure most of you are familiar with Homey oh my!, but if not, you are missing out on an amazing blog!

Crushing On: Homey oh my!

No-Sew Tote Bag || Graphic Circle Art || Gold Leaf Jewelry Tray

All of this brilliance is created by Amy, an LA gal and one of the nicest online pals I’ve met. She’s also my copper/brass-loving twin—obviously a girl of good taste.

I was flabbergasted to discover that Amy has only been blogging since September 2013; you would never know it from her pro site design and her popularity on Craftgawker and Pinterest!

Besides great DIY projects, Amy also blogs decorating advice and inspirationAnd today (well not actually today, I’m on the other side of the world right now, but you know what I mean), Amy was kind enough to humor me in an attempt to play journalist and interview her. Here are my National Enquirer-worthy questions and Amy’s fabulous responses:

………………………………………………….

What inspired you to start DIYing? Do you remember the first thing you made?

I got this question a lot from my friends because they always followed it with “I didn’t know you were into DIY…” It makes sense why they’d say that, because I didn’t REALLY start DIYing until I started my blog! It was around that time I moved into an apartment that I adored and still do, which inspired me to do a lot of DIY decor since I’m decorating on a budget. Before that though, all I remember ever making is jewelry, and I’m talking about during my childhood years—friendship bracelets, earrings, clay beads, none of which I’ve kept but man would it be fun if I could look at them now.

What’s your favorite tool or material?

Spray paint. Always. If I love the shape of an item but not the color, spray paint will usually save the day. I will never get over its transformative powers. My spray paint projects tend to be my most popular ones, so I think everyone else is enjoying the magic as well!

What advice would you give to new DIYers who don’t know where to begin?

Start small. I majorly felt the fear of messing up when I started DIYing (still do sometimes), and I think the key to keeping yourself from being discouraged is to start with projects that don’t heavily rely on practiced skills or a large number of resources. From there you’ll get a feel for what crafts you want to explore more and start taking bigger risks. Research is also very important! I try to research tried and true practices related to my project ideas before doing them, especially if it requires a new skill I’ve never tried before.

What’s your favorite thing to eat on toast?

Ooo, this is a tough one. I love cream cheese and lox on toast, but if I really listen to my heart, it says butter. Most preferably Kerry Gold Butter, the best butter ever.

………………………………………………….

Thank you so much, Amy, for letting me feature your beautiful blog!

If you somehow got through this whole post without clicking on any of those links, be sure to hop on over to Homey oh my! now and show Amy some love! Which of her projects is your favorite?